Friday 29 September 2017

Welcoming Fall House Tour

Hey there friends, and welcome visitors for the Fabulous Fall Home Tour!

fabulous fall home tour 2017

It’s been, what — seven years? — since my last real fall decorating post? For those of you that already follow along, you already probably think this is a bit unique since I never really participate much in “house tour” blog hops. That’s because they often require three things I don’t really possess:

  1. Multiple rooms in my house clean enough to decorate at the same time
  2. Adding home decor on top of my home renovation list to meet a deadline (procrastinators, unite!… tomorrow)
  3. Experience with room styling to the point of looking (effortlessly) polished

So, usually, my big transition into fall mostly just involves switching from white to red… wine. But, as I mentioned last week, things seemed to align just right where I had an afternoon to go grab some flowers and other items while I was out and just have fun with fall for a minute. Perhaps it’s that I knew I’d be out earlier this week for a sponsored event and wanted to do something that required a different part of my brain (chainsaws and cutting concrete and throwing stuff, oh my — but it was so much fun and I you should see me throw at a target with an axe). Or, perhaps it was simply that my sister was coming over last weekend for dinner. Since I hardly have her over, it seemed only right to decorate a little. Whatever the inspiration, it stuck, and here I am with an actual fall home tour!

blue front door with red mums - fall house tour

Some of the links to products in this post support this site through affiliate sales if you choose to make a purchase. For more, see my disclosure page.

Let’s start with the front door and porch: I didn’t really plan to decorate with any traditional fall colors, but I found a bunch of red mums on clearance and they seemed too good to pass up ($3 each). Combined with some storage baskets I had on hand and tall dried bunches of who-knows-what (confession: I don’t read the descriptions on the decorations I buy… I just look for something that looks fall-ish and go with it), it all seemed to work well with an olive wreath I picked up from Amazon.

fall front door with new wreath and red mums

entryway front flowers and fall tour

closeup of front door - fall home tour

front door fall wreath

In the living room, I added a few more cozy blankets to the new sectional, added another storage basket underneath the coffee table, and spread out some inexpensive leaves under a wooden lantern (similar).

lantern on coffee table

fall coffee table

lantern and fall leaf decor on coffee table - fall home tour

living room blankets for the dogs

simple fall coffee table

I also switched out Charlie’s toy basket for something that looked almost sweater-like (the rope pattern reminds me of winter textiles). I didn’t want to do a big huge push to make everything match since I am never that coordinated, but I was also cleaning up a water spill from the pup and the extra hand towel just looked nice draped on the edge. Lemons –> lemonade.

fall living room update dog toy bin

I buy hand towels in sets (like every person ever, probably), so the matching one went into the hallway bathroom; I say this mainly because I didn’t want you guys thinking I walked across the living room to put Charlie’s slobber towel in the bathroom towel holder! One of the things I’ve learned from my sister (who loves every holiday and decorates for each) is that when it comes to seasonal decorating, pretty much anything is fair game, including the bathroom. And if you feel like just one touch to the room is enough, then go for it!

adding greenery and new towels to hall bathroom

Finally, in the dining room, I added more flowers, more greenery, and began setting up the table for dinner the next night. I’ll admit, I basically overdid it (I may or may not have been playing with some of my Christmas decor simultaneously), but I still liked the end result — blame the $2.99 flowers at Trader Joe’s. Because the room is such a vibrant color on the walls, I like to go with more neutrals, and the white/soft green combo is of course a favorite of mine.

dining room table flowers

The rose-colored candle holders on either end were on clearance from Joann’s. I like to add metallics when I decorate no matter the season, so a few holiday standards were also thrown in (like the smaller mercury glass candle holders and placemats).

greenery on dining room table

I also added in some linen constellation napkins (these are OLD, so here is a similar version). They were a big hit with my nerdy boyfriend.

dining plate with constellation napkins

For me though, the biggest update in the house to signify the season’s change is still the new fire pit. Nothing says fall to me quite as much as the ability to have really amazing s’mores (and to be honest, I like that it makes the house smell like a bonfire).

fall home tour bonfire pit

backyard fire pit

So, that’s pretty much how I welcomed fall this year at the UDH. Oh! And one more item: any big cross-stitching fans out there? I cross-stitched a fall tree using my own pattern and just finished that up as of last night. I am writing all the details on how I create my own designs, so if you’re interested, subscribe here to get notification on that post next week (I’ll have a free download for the pattern as well).

fall tree cross stitch

Are you decorating for fall this year? Also, don’t forget: this is a blog hop, so check out the others in the tour! Brittany from Pretty Handy Girl is hosting, and here is the full list!

The post Welcoming Fall House Tour appeared first on The Ugly Duckling House.

Website // Subscribe // Advertise // Twitter // Facebook // Google+


from The Ugly Duckling House https://www.uglyducklinghouse.com/welcoming-fall-house-tour/

Tuesday 26 September 2017

Enlighten your outdoor garden space with rattan garden furniture


What can be more wonderful than welcoming your guests for alfresco lunches during summers and springs? And yes, what better than to deck up your outdoor recreational space with rattan garden furniture. They are a great choice when you want to look for something different than the regular indoor dining tables. So, renovate your garden space with the super stylish and highly functional rattan garden dining sets.
How to deck up your outdoor space with rattan furniture?

A description...


Rattan or should we say natural rattan is now overpowered by synthetic rattan in terms of popularity and use. Over the years, the love for rattan outdoor garden furniture has only increased, thanks to the manufacturers who discovered HDPE that offers extreme versatility, functionality and above all looks extremely stylish and lasts longer than you could think of.
The first consideration that you should pay is the space for which you are thinking of decking up with rattan furniture. For the conservatories and the patio, you can well think of corner sofa sets or even a table and a chair or even a cube set would look awesome. Well, if it is garden space, then first measure the space and then look for the furniture.
The options in dining sets are immense. You can pick from round dining set, square, rectangle, cube or even corner set. if you just want to achieve a cosy space wherein you can soak in the sun reading your favourite book or spending some close moments with your friends or loved ones, you can well consider sofa sets where you can unwind and retire for the day bed. Day beds are also becoming quite popular for you need not require any parasol and you can still beat the sun and enjoy a small nap.
It is apt to call rattan outdoor garden furniture “Bold and Beautiful” for it is manufactured from the best quality HDPE. You can leave them outdoors for the entire rain even if it is raining, snowfall or harsh sun rays. Rattan furniture bravely faces all the vagaries of nature and still maintains its shine and elegance.
Today’s rattan furniture comes in various colours too. it is not just natural hues from which you have to make a choice, but today you can choose from black, grey, white and silver as well. If you want more colours, why not have colourful scatters that you can change as and when you want. The cushion covers are removable and even washable too.
At Brooks Rattan Garden Furniture, outdoor rattan garden furniture not only comes with extensive range but with the promise of best price and free shipping. Moreover, you also enjoy an extended 10 year all weather guarantee on the entire range.
Outdoor rattan garden furniture is definitely a stylish and at the same time an intelligent investment for the home owners who want to give a different look to their outdoor recreational space.


from Home My Heaven: Home Improvement Blog http://www.homemyheaven.co.uk/2017/09/outdoor-garden-space-rattan-garden-furniture.html

Friday 22 September 2017

Does Artwork Enhance a Home?


Way back in the mists of time, prehistoric man created cave paintings using naturally sourced materials, presumably to add a bit of ambiance to his home. As the centuries rolled on, man invested in paintings and sculptures to decorate his home. He sought out talented individuals and commissioned works of art. By the time the 20th century came, the development of mass-market printing techniques enabled artwork to be distributed to the masses. Mrs. Jones at 49 Acacia Avenue couldn’t afford to buy a Van Gogh painting of sunflowers, but she could afford a nice fine art reproduction print in a pretty frame. 

art in house


Of course, not everyone appreciates artwork. Some people have no interest in hanging paintings or prints on their wall. For them, the idea of browsing art galleries and buying a painting doesn’t appeal. They would rather hang a 4K HDR top-of-the-range television on their wall and stare at that all night. Well, each to their own, but in case you are ruminating on the question of whether artwork enhancesa home, let’s discuss.

What’s Your Personal Taste in Art?

You don’t need to be an expert to appreciate fine art. We all have our own personal taste in art. Some people love realistic landscapes whereas others prefer modernist abstract paintings. Try to imagine how the world would look with no pictures, no advertising in magazines or on the screen. The world would be a very different place. 

Art is known to relieve stress, which is why it is common to see artwork in hospitals and medical centers. Sure, staring at a painting of a cute puppy is probably not going to make your toothache go away, but it might distract you for a few blissful moments. 

art in house

Art Soothes Stress

The fact is, people instinctively feel better when they can look at artwork. It helps us to relax, soothes a fractious mood, and creates a sense of harmony, in much the same way that listening to music does. Researchers have also found that artwork in offices enhances productivity, which is why many businesses pay a lot of money for fine art paintings on top sites like fineartamerica.com to hang on their walls! 

Hanging art on your wall is a form of self-expression. We are drawn to artwork that “speaks” to us on a subliminal level. You might not understand it, but it doesn’t mean you can’t appreciate it. Art often provokes strong emotions, some positive and some negative. Choosing artwork for your walls gives people an insight into your personality. If they don’t know you that well, they can glean things about you from the type of artwork you like. 


art in house

The Finishing Touch

Artwork adds a finishing touch to a room’s décor. Think of a print or painting as the icing on the cake. Bare, naked walls are plain and uninspiring, but a colorful painting hung in a prominent spot invites conversation and enhances the room immeasurably. 

You don’t need to be an expert to buy art. You also don’t need to be wealthy. Look for fine art prints or work created by local artists and select the pieces that you love the most.


from Home My Heaven: Home Improvement Blog http://www.homemyheaven.co.uk/2017/09/does-artwork-enhance-home.html

7 Hassle free tips when moving house in Sarasota


Are you planning a move to Sarasota, FL? Maybe you have to relocate for work or an irresistible business opportunity. Perhaps you are in the military or there is a serious health issue in your family. Whatever the situation, you do not have to compound things by stressing over the move, which is a common response. Instead, here are seven moving tips to make packing up your life and embarking on a new journey hassle-free.

moving house in Sarasota


1. Plan Ahead

As anyone who has moved can tell you, the process of relocating your home and family to a new location can be thrilling, frustrating, exciting, and angst-filled all at the same time. The best way to avoid chaos during a move is to have everything planned out in advance and contingencies in place if problems arise. Start packing as soon as possible and know what items will be going with you. Then, you can make arrangements for donations and decide how to dispose of other unwanted and/or unneeded items. Maybe family or friends can benefit from your hand-me-downs. It is also a good idea to contact moving and storage companies inSarasota well in advance to ensure services and/or availability on the desired moving date(s).

2. Compile a List

When moving, you want to make sure that everything is documented. As such, prior to packing your first box, you need to develop a record keeping and tracking system. You should also save it to your computer for future reference and/or if problems arise. You can organize via labels, numbers, stickers, or some other coding system to track the contents of your home. If you are on a shoestring budget and/or your family has been devastated by the recent hurricanes in Florida, then even a simple notebook could do the job. No matter what system you use, every box, suitcase, and/or storage container should be marked according to the record keeping system.

3. Find Plenty of Packing Materials

When preparing for a move, you must have plenty of packing materials. This means stocking up on boxes, tape, labels, stickers, and other essential items. The best places to find boxes include liquor stores, grocery chains, recycling centers, etc. They usually have an abundance of clean boxes of varying sizes that are free for the taking. If you are fond of online shopping, save your clean shipping containers or ask family and/or friends to save theirs for you. In a pinch, you can also purchase clean boxes that are suitable for packing. Instead of spending money on bubble wrap, consider using blankets, newspapers, sheets, etc. to cushion fragile items and keep them safe.

4. Keep Important Papers Within Reach

All personal information and important papers,such as personal ID, credit cards, social security information, recent bank records, etc., should be kept within reach. You should have a special container or place for these items and know where they are at all times.

5. Keep Cherished Items Out of Reach

As with number 4 above, any family heirlooms and cherished items should be given extra care and attention. They should be kept out of harm's way and moved by their owners if possible. If this is not an option, the movers should be notified in advance of their significance and extra precautions should be taken to ensure their safe transport.

6. Compartmentalize Your Belongings

In preparation for a move, you should take the opportunity to sort through your belongings and decide their fate. The simplest and most effective way is to compartmentalize your belongings into four sections--Keep, Sell, Donate, and Trash. As you are going through your home and packing up, this strategy should be employed in each room.

7. Downsize Your Life

A relocation presents the opportunity for new beginnings. Consider the benefits of downsizing as you go and the potential profit that can be made from selling off unwanted and/or unneeded items.

As we addressed in this article, there are many ways to help make your upcoming move easier and more efficient. These tips can assist anyone with their relocation--whether it is in Sarasota, across town, coast-to-coast, or another country. Consider these strategies for a hassle-free move when packing up your possessions and embarking on a new life.


from Home My Heaven: Home Improvement Blog http://www.homemyheaven.co.uk/2017/09/moving-house-sarasota.html

Slooooowing Down for Fall

My thought on this first day of fall: I miss summer.

fall reflection

Or, perhaps more accurately: I missed summer. Today is the first official day of fall, and I guess I feel a little strange about it. In the midst of all my hurried planning for the things I’m trying to finish and the projects I’m hoping to work on soon (and more specifically, finding sponsors for those bigger budgets), I missed out on what I normally associate with summer for the first time. I missed a lot of pool days, sunny barbecues, and basically anything having to do with fun in a bathing suit (not that I run around barbecues in a bathing suit — I stopped doing that around age 7, I think — but you get what I mean). Considering how much I enjoy the beach, that’s actually an interesting reflection for me; I managed to go to the beach even when I was overwhelmed in grad school or heartbroken or anything else that was causing me stress. Not this year, though.

Still, I can’t honestly say I regret it — it just wasn’t a priority these last few months. My head is swimming with new plans and on how to make them all happen (I am itching to start building up the new pub shed asap), and I feel a sense of resolve about it. Rather than lament that I missed out though, my focus is more on what the next few years might bring, and makes me excited rather than disappointed in that decision.

first day of fall - fallen leaves

Autumn is also a season I usually miss out on because summer lasts for so long in the south. My typical style is to keep rushing around as if nothing has changed in September (other than football), while everyone else around me acts like pumpkins are suddenly cool rather than that weird squash we pretend doesn’t exist the rest of the year. For me, things are still hot, the days are still long, and there is plenty of opportunity for projects before winter. And then, suddenly: the daylight disappears and its Thanksgiving and Christmas and I feel like something was snatched away before I was ready. And again… I don’t really feel that way this year.

Speaking of excited: I finished filling in the gravel area of the new fire pit. I am so glad I found a cheap source for gravel and was able to complete it in time for the first bonfire with friends of the year (I’m having a few friends over this weekend and then hopefully a much bigger party soon… I LOVE that I’m getting to that point with this house!).

raking out gravel

It took another full truckload to get everything filled in, but that’s also because I moved some of the gravel from the first load over to the corner garden area to make it all match. Once it was complete, though, I did something else I’ve always thought I’d like to do in the yard: added some string lights around the remaining tree in the center (they’re coming off really yellow in this photo because I shot while the sun was doing down, but in person they seem more of a warm white):

new fire pit filled in and new lights around tree

(If you can, ignore the brush pile and fencing materials in the back… those are things from removing the chain link fence along the back and the debris from Irma, which will be part of this weekend’s bonfire.)

Eventually, the plan is to string outdoor cafe lights from the house to the tree and to the new pub shed to make it all one flowing entertaining area while still having separate “zones”, sort of like how Brooklyn Limestone strung lights above this fire pit (only the lights will likely be tied to other landmarks in the yard rather than strung up separately):

So, all that to say: while I’m not entirely there yet, it did feel a little nice to put up these lights (temporarily — they need to be re-wrapped and secured and another set needs to be added to go up the tree further) and drink it in that fall is going to be full of new memories. I may have missed out on the quintessential summer, but this might also be the first time I’ve ever been fully decorated for fall on the first day rather than playing catch up or never even getting around to it (who is this prepared person???). I even have (*gasp*) a fall tour planned for next week.

fall coffee table

That’s the only sneak peek I can share for now, but I hope you enjoy this coming season as much as I’m hoping to. What have you been working on lately?

The post Slooooowing Down for Fall appeared first on The Ugly Duckling House.

Website // Subscribe // Advertise // Twitter // Facebook // Google+


from The Ugly Duckling House https://www.uglyducklinghouse.com/slooooowing-down-for-fall/

Thursday 21 September 2017

Patch That Pipe: What To Do As You Wait For The Plumber

Introduction
What happens when you have a faulty pipe in your property, and you don`t have any experience with repairing such types of damage? Well, it is important that you make perceptive choices, to ensure that you don't rack up a large water bill due to the excessive wastage and in terms of pipe repair costs.
Although, pipe repair might seem like a simple procedure, it requires the competence of professional company to achieve the best results.
This is especially true if you have a large piece of property which has several water flow supply lines and piping systems. It can be difficult to repair the damaged sections of such a system, but you can easily patch up any damaged sections as you wait for the plumber to arrive.
This is perhaps one of the best solutions for you to start with for your unique needs. It will help you save extra cash on wasted water. The following are some of the tips for patching a pipe, as you wait for the plumber to arrive on the scene.

Tips
Block the seepage or damaged area
If the damaged area is simple to access, you want to ensure that you block that damaged area to avoid any wastage of water. You can use various items including cloths, adhesives and more.
By blocking any damaged sections of the pipe, you increase the likelihood that your pipe won't suffer from any added damage or compromised performance.
Turn of the water supply
More so, another important factor for you to consider is that you should turn off the water supply. By turning off the water supply, you reduce any what that is wasted. A good recommendation is to directly turn off the water and main supply as you wait for the plumber to arrive at your property.
Other Tips
Broadly speaking, when it comes to ensuring that your pipe suffers no added damaged or compromised performance, ensure that you make savvy choices for the best results. In fact, ensure that you develop you DIY pipe repair skills since they might come in handy when completing any future projects.
More so, ensure that you also acquire a comprehensive repair tool set, which will help you during the repair procedures, as you wait for the plumber to arrive at your destination.
Benefits of a plumber service
Professional services and experienced staff
Satisfaction guarantee
Long lasting results
Affordable services packages


from Home My Heaven: Home Improvement Blog http://www.homemyheaven.co.uk/2017/09/patch-that-pipe.html

Tuesday 19 September 2017

How Frequent Should You Clean Your Air Ducts

How frequent should you clean your air ducts? The short answer is from three to five years, depending on the amount of dust in your home, dander and hair from pets or an event that would trigger air duct cleaning requirements. The best way to confirm whether you need your air ducts cleaned is to check around your air vents and also the filter area.

If your air vents show signs of dust or even mold it is time to have your all of your ducts cleaned. Check around your cold air return vents for signs of dust buildup as well as around the hot air vents. Remove one of the grilles and using a flashlight observe whether there is a buildup of dust in the duct.


Most furnace and HVAC manufacturers recommend that you change the filters in your system once a year or even more often if you live in dusty conditions or if there is lots of pet hair etc. When you change the filter, examine the filter to determine whether there is a buildup of dust etc.. Check the motor compartment also. If there is dust or pet hair accumulating, you may need your ducts cleaned as well.

Other Triggers for air duct cleaning

New Home Construction – during construction of new homes a great deal of drywall dust and even garbage can settle into the vents. You may have cigarette butts, soft drink cans etc. in the ducts. Needless to say it is a good idea to have all of the vents cleaned before you turn on your furnace or HVAC for the first time.

Major Renovations – if you have just completed renovations in your home, chances are that some dust will have collected in the ducts via the cold air return. If the renovation work is underway during a time when the furnace fan is running, not only will there be dust in the system, you may find that a fine dust has percolated throughout your home. You may need a thorough cleaning of the floors as well as the ducts in a situation like this.

Damp Conditions – In some cases, mold spores can develop in damp basements and find their way into the cooling or heating system. If this is the case consumers should hire a duct cleaning company who specializes in removing mold from the ducts.

Residents with Allergies – During the spring and summer, windows are open, our pets are in and out and our family comes and go. We all track dust and pollen into the home. On windy days a great deal of pollen can be blown into the house if you have your windows open. Although there are no studies to support duct cleaning will help consumers who suffer from allergies, many will have their ducts cleaned at the end of the prime pollen season.

Typically, a clean home will not need duct cleaning as often, unless there are circumstances as mentioned above. Evaluate your home, lifestyle and decide the best course of action with respect to duct cleaning for your family.


from Home My Heaven: Home Improvement Blog http://www.homemyheaven.co.uk/2017/09/clean-your-air-duct.html

Sunday 17 September 2017

Herbed Goat Cheese Crostini with Roasted Cherry Tomatoes

This herbed goat cheese crostini with roasted cherry tomatoes recipe make not only beautiful appetizers, but they’re also so easy!

Hey there! It’s Pam and Sara, popping in again from Biscuits & Burlap. Did you know The Ugly Duckling House was delving into the foodie world? We’re so exciting to be sharing some of our favorite recipes with all Sarah’s readers! If you missed our official introduction (including some of our readers’ favorite recipes) definitely check it out. Our first post brought you Limoncello Cucumber Coolers and it’s not too late to make them before the summer heat dies down!

This week we’re bringing you a scrumptious crostini with herbed goat cheese and roasted cherry tomatoes. These crostini are not only beautiful appetizers, but they’re also so easy!

What is a “crostini”?

Crostini are one of my favorite appetizers to take to a party because they’re so easy and versatile! Basically, a crostini is anything on top of a little piece of toasted bread. In this case, we used slices of French baguette.

Can you get enough goat cheese? I’m telling you, I could live off of this stuff. Herbed goat cheese is something we make at home when we need a quick appetizer (like when the neighbors stop by unexpectedly!) and it really is one of my favorite spreads.

We usually mix the goat cheese with cream cheese, olive oil, lemon zest, crushed red pepper, salt, and whatever fresh herbs we have on hand. Mash it all together and spread it on the toasted bread. Instant delicious appetizer!

Today we’re taking it a step farther by topping that creamy goat cheese mixture with sweet roasted cherry tomatoes. Cut your cherry tomatoes in half and toss them in olive oil, kosher salt, freshly round black pepper, and garlic. Roast them cut side up for 30-40 minutes. Let the tomatoes cool before spooning them on top of the prepared crostini. Delish!

Looking for more ideas? Here are some other tasty crostini toppings!

Print

Herbed Goat Cheese Crostini with Roasted Cherry Tomatoes

herbed goat cheese crostini with roasted tomatoes

These crostini with roasted cherry tomatoes and herbed goat cheese are not only beautiful appetizers, but they’re also so easy!

  • Author:

Ingredients

  • 1 french baguette, sliced and toasted
  • 4 oz goat cheese
  • 2 oz cream cheese
  • 1 t fresh rosemary, chopped
  • 4-5 basil leaves, chopped
  • zest of 1/2 lemon
  • 1/4 t kosher salt
  • red pepper flakes to taste
  • 2 cups cherry tomatoes, halved
  • 1 t olive oil
  • 1/2 t kosher salt
  • 1 clove garlic, minced
  • freshly ground black pepper
  • drizzle of balsamic vinegar(optional)

Instructions

  1. Preheat oven to 350°.
  2. Mash goat cheese and next 6 ingredients together until well-blended. Cover and chill for 1 hour.
  3. Toss tomato halves in remaining ingredients (except balsamic vinegar) and spread on baking sheet, cut side up, in a single layer. Roast 30-40 minutes.
  4. Let toast and tomatoes cool to room temperature.
  5. Spread goat cheese mixture on toasted bread. Top with a spoonful of tomato mixture. Garnish with more fresh herbs and a drizzle of balsamic vinegar if desired.

What else do you like to put on crostini?

The post Herbed Goat Cheese Crostini with Roasted Cherry Tomatoes appeared first on The Ugly Duckling House.

Website // Subscribe // Advertise // Twitter // Facebook // Google+


from The Ugly Duckling House https://www.uglyducklinghouse.com/herbed-goat-cheese-crostini-roasted-cherry-tomatoes/

Wednesday 6 September 2017

Removing the Chain Link Fence! (And Trying to Be a Good Neighbor)

Tips on how to remove a chain link fence in just an afternoon — plus how to fix a neighbor’s fence without spending a dime.

Over the last week, some of the biggest changes around the back yard had more to do with things being removed than things being added. I finally removed the chain link fence!

how to remove chain link fence

As you can see from the before photo, I got the idea when I was filling in the new back hedge line with mulch (for tips on how to save a LOT of money on gravel and mulch, check out this post). You can get some of the story from the photo (below) alone, but the backstory (at least the part where I’m trying to be a decent neighbor) is also a part of this, so I’ll address that first.

the rear fence line with brown mulch

FYI, this post contains affiliate links, which serve to support this site a few cents at a time from tools/products I recommend. These do not increase your purchase price if you buy something from one of my recommendations. Thanks for supporting the UDH!

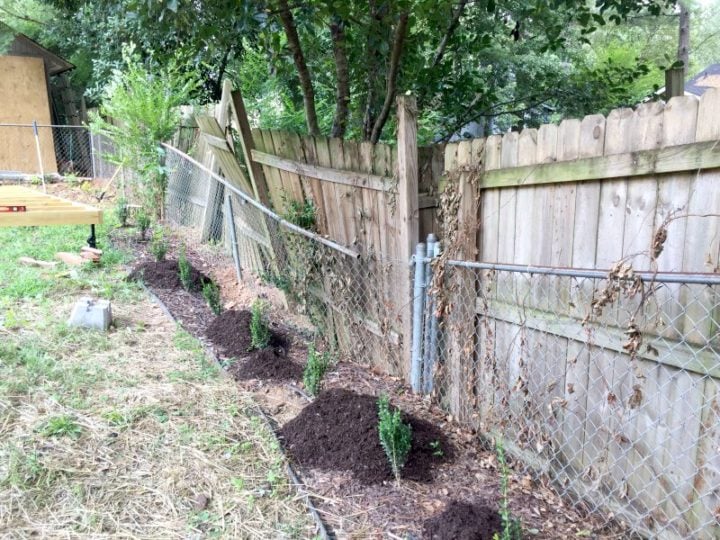
There are a number of things in the above photo making my eye twitch. One thing, obviously, is the chain link fence itself. There had also been an overgrowth of poison ivy from one neighbor’s yard, plants/weeds growing in between my fence and the neighbors’ that I could never seem to reach effectively, and oh yeah — one of my neighbor’s fences looked like shit.

Just so you know the whole layout/situation, my house is bordered by four neighbors — one on either side and two more along the back (basically half of another guy’s yard is on the left and half of another is on the right… thus the difference in the appearance/quality of the fence line about halfway through the fence in these photos). These are the two neighbors I don’t really know and their own back yards face mine, so there is very little need to interact other than with the two on either side. Basically, it’s your typical US subdivision kind of layout.

Other than the chain link fence and the small wooden gate/fence I’ve installed myself to fully enclose my yard, all other fences belong to my neighbors (because the “bad” sides face me, it’s easy to mistake that they’re mine, but they were installed the opposite way of most etiquette standards — it happens ALL THE TIME in Georgia, especially with backyard fences). My neighborhood is old and doesn’t have an HOA (either it was done away with or never existed). On the upside, I don’t have the added expense or hassles from restrictive HOA rules (a blessing considering the number of changes I’ve made!). Conversely, the downside is that I don’t have anything other than county codes to rely on when something goes wrong (I am outside of downtown city ordinances, so I don’t have to get approval from those, only the county). In most cases, this is a welcome thing, as most of my neighbors are considerate and it’s a very safe neighborhood, so while the neighborhood is active with lots of walkers, pets, and kids, we all pretty much keep to ourselves unless there’s a conflict.

However, those of you who have been reading a while already know: my neighbors’ fences have been a nuisance on several occasions, and I’ve had to learn some low-budget ways to compensate when they go into disrepair. In most examples from the past, it’s been the fence to the right, the main issue being that through extreme overgrowth of bamboo (a very invasive variety) and age, the fence has basically fallen apart. There isn’t a lot I can do to fix a fence I don’t own other than installing a whole new fence of my own, which would be very costly. So, I’ve had to get creative with my limited budget, such as taking some leftover fence panels I got from my sister and building raised garden beds:

DIY raised garden beds

Occasionally, I’ve also re-secured some of their loose fence panels if they have warped from the weather or used leftover fence pieces, but it’s more or less just to avoid having an even bigger problem of having the whole thing fall down. I’m trying to help out as best I can if I have the materials/scrap on-hand (avoid direct costs, basically). The neighbors on my right side are elderly and from the conversations I’ve had with them, they are on a limited budget, so I just don’t have it in me to ask that they put a priority on replacing their fence. Instead, I came up with my gardenia beds as a solution, and since they’re growing in so well, it is just a matter of time before they are tall enough to obscure the broken fence behind it:

gardenias growing - garden beds 2017

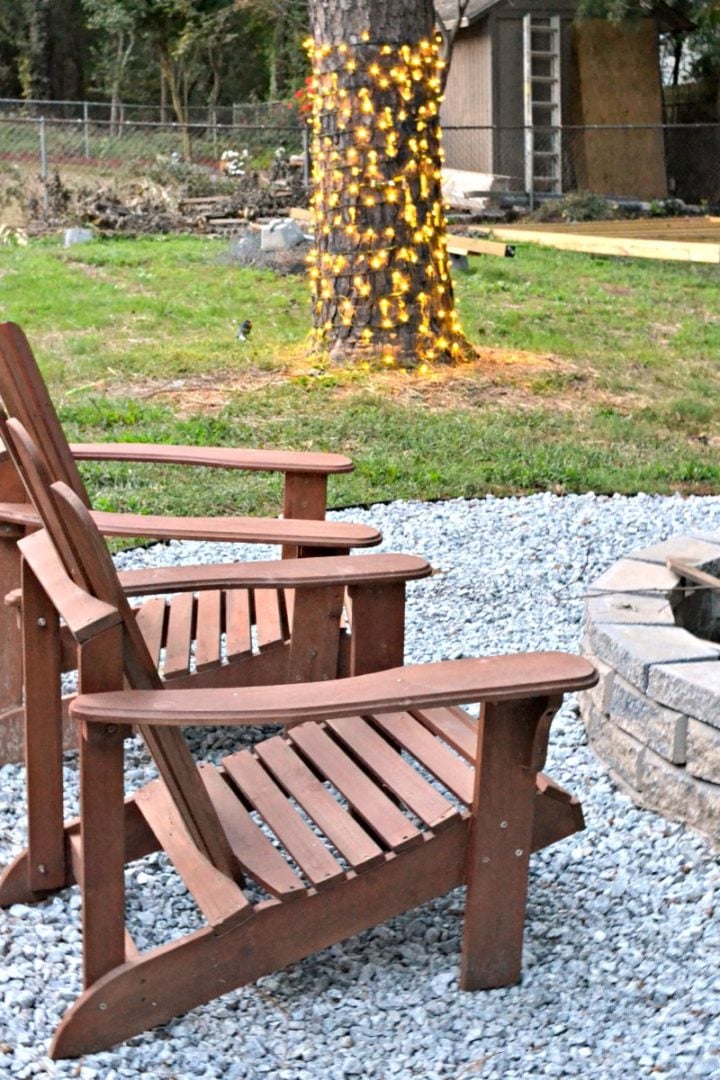
Plus, they add a lot of beauty and fragrance to the entire right side of the yard, which is right next to the new fire pit and will make for a great entertaining area someday!

gardenias growing and thriving 2017

ANYWAY… back to the other fence. The neighbor on my back left side had a tree fall down a few months ago, which served as the catalyst for removing my chain link fence. The tree itself was huge and right on the other side, which meant all of the uprooting both A) caused a huge hole in the ground, which might eventually turn into an erosion problem and B) wrecked a whole section of the fence separating us, which busted my chain link on that side.

the rear fence line with brown mulch

Frick. You can imagine my irritation with this, especially after filling in this entire section last year with fill dirt (fixing an erosion problem only to get another that I can do nothing about? Ugh). The huge tree actually fell across both of my rear-neighbors’ lots, including across the fence that divides them from each other. The neighbor with the tree chose to leave it untouched, and the home now appears vacant, making me think that it’s actually an investment property (I haven’t actually seen anyone at the property for about two months now, but I’ve seen a handful of people in and out). About a month after the tree fell, someone called the county and the tree was removed, but there was no repair done to the fence. Since it’s not my fence though, there still isn’t a whole lot I can do about it except glare at the ugliness. Or perhaps, I can fix it a little?

There was really no desire to fix my broken fence that I already hated, so as I set in to mulch for fall, I figured it might be the right time to just rip out the damn thing and see about the other fence as best I could.

How to Remove Chain Link Fence

Kill off weeds and vines.

First, I treated the poison ivy and other encroaching vines a few weeks prior with some poison ivy spray. I use this stuff and it is REALLY effective, so I now buy it in the concentrated version and mix it up myself (because it’s cheaper per fill over time) rather than buy a new spray container (you can refill over and over with the concentrated mix). My dad and sister are highly allergic, so knowing how to identify it, avoid it, and treat it are covered here.

chain link fence with dead ivy

Clip fence ties.

Then, I went along the fence and clipped the wires that held the chain link onto each top rail (often called “fence ties”). For something like this, you’ll need a small bolt cutter with a sharp blade (even though mine was new from this set, it still got dull by the end of this project, so be sure it’s decent quality!).

Clipping top of chain link fence

I also clipped the ties that hold on the chain link vertically. For any stubborn ones that didn’t move with ease, I used a set of pliers.

how to remove chain link fence

Remove each fence component in sections.

It was a (mostly) simple matter to slide out the top rail and wrap up the chain link in a large roll. This was also the time to remove the dead vines.

The vertical poles remained at this point, but I had some help yanking them all out (except for the ones on each end of the chain link… those are much more secured, so I might actually wrap them in pre-treated wood rather than the effort it will take to remove).

poles remain along fence

Clip and tackle tricky areas:

There were a few sections that were difficult for comically absurd reasons — such as the freaking tree growing through the links on the left side… I actually had to clip out parts of the fence before I could take an axe to it!

tree growing through fence

That’s pretty much it! Uninstalling a chain link fence is incredibly easy and looks so much better to have this removed. But as I removed the fence, it made the broken section of my neighbor’s fence even weaker (since a large part of one panel was basically loosely resting on the top rail of my fence after the fallen tree broke both). I could have taken the broken piece and simply placed it in my neighbor’s yard, but after waiting what I felt was an appropriate period for them to deal with it (again, it appears to be a rental, so even though there have been a small number of visitors to the property, I haven’t seen anyone move in for a while), I decided that the best aesthetic move (and better security for my dog not to wind up in their yard with a big hole in the fence) would be to re-secure the fence panel using some string and screws I already had on hand. The neighbor will still have to eventually fix their fence for their long-term use, but at least it will no longer be falling into my yard or crushing my new hedge plants. Plus, this seemed more like the “neighborly” thing to do — I had the exterior screws and string, and it took about 30 minutes. In time, the post will set on its own accord too and allow me to eventually remove the reinforcement.

Using string to help straighten out fence

I did the same thing with the other end of the broken piece, only tying it to another tree (this also grows in their lot… they basically just have a lot of trees right next to their fence — if you’re installing a fence of your own, do not do this!). But doing both of these things straightened out the rest of the fence enough to screw each piece back to each other.

putting frame of fence back together

With the panel back up (straightish — the remaining tree in the corner of their lot still pushes part of one panel out), I continued on with the rest of my mulching and the back part of the yard now looks like this!

rear hedge line filled with new mulch

Considering where it started — needing mulch, overgrown weeds, a broken fence, and poison ivy — I think it’s a huge upgrade!

the rear fence line with brown mulch

Upgrade and onward!

P.S. Just in case anyone’s worried about me touching someone else’s fence, this is one of those relationships-with-neighbors-are-highly-subjective types of things. Culturally, my neighborhood just seems to be cool with helping each other out, even if we’re not the neighborhood barbecue type. I doubt they’ll even notice really, but this at least prevents my yard from looking worse until they fix it (and that would be just a lot of needless anger to stew over something like this when I already have the means to temporarily provide a solution).


P.P.S. This is completely off topic, but what the hell: I made some logo tees for the blog.

announcing t-shirts and tanks

tshirt options

I did it mainly because I need a few to wear when I make my DIY videos and photos when I work with brands (I noticed a lot of folks use their own brands in videos, so it seems like a good idea because I’ll forget to plug my own website if I’m flustered enough).

The company I found to make them requires only 5 shirts of each style before printing (regardless of color/size/t-shirt type), so since I already planned on ordering almost that many for myself, I figured I’d also offer these to you guys (I wouldn’t have thought so, but I only just listed these yesterday and people other than me have already bought a couple, so shows what I know, right?). There are currently 2 options: one has my logo with my tagline on the back (“I’m not going gray… that’s just paint in my hair”) and the other just has a simplified style on the front (same logo font, just no duck and nothing on the back). Each is available in a small variety of colors, comes in tank or tee (the slouchy tanks are my favorite), and are made with a lightweight, soft cotton blend fabric (I don’t yet have these shipped to me obviously, but I have other tees made by Next Level, and I’m literally wearing one from them as I’m typing, ha!) .

These tees are available for THIS MONTH ONLY, so if you’re one of the nine people who have asked me in the past to make these t-shirts (nine is a high estimate and includes my mom), then here you go. Note that I need at least 5 of each t-shirt type in order for them to ship, but if those sales are met then both types will ship in October (I am honestly so excited to wear these in future tutorials!). I’m brainstorming a few others that I’ve always wanted too (yes, “Squirrels are assholes” and “What the frass?!” are in consideration, but I will roll out things like that later).

Thanks, friends!

The post Removing the Chain Link Fence! (And Trying to Be a Good Neighbor) appeared first on The Ugly Duckling House.

Website // Subscribe // Advertise // Twitter // Facebook // Google+


from The Ugly Duckling House https://www.uglyducklinghouse.com/remove-chain-link-fence/