Bespoke kitchens, furniture makers London, have been designing, manufacturing and installing high specification bespoke kitchens London and handmade furniture London, since 1995
Getting on top of storage will help sell your home faster and may even earn a better price.
A neatly organised house immediately creates the calm atmosphere and welcoming ambiance that buyers find appealing.
Create Space
Most of our possessions probably don’t see the light of day from one year’s end to the next. They lurk in cupboards and drawers, sometimes taking up so much room there is no space for the things we do use.
Those things all mean something. Selling your home shouldn’t mean you have to ditch all the precious, memory-invoking possessions you’ve gathered over the years.
A clever way of decluttering is through self storage.Rooms or lockersare affordable, and there are no long term lock-ins. If you need to create a more spacious atmosphere, but don’t want to permanently lose the things you love but don’t use, this could be your life saver.
Tackle Problem Rooms
Areas such as bathrooms and children’s bedrooms spring to mind. These rooms tend to be home to myriad small items that are hard to control.
Storage in children’s rooms is relatively easy:
·Beds can be brilliant. Ottoman beds, cabin or captain beds, or divans with drawers can hide many a collection without taking up additional floor space. Choosing a high-rise bed will also provide a desk area, offering space for craft, homework or the TV if your child has one of their own.
·Stackable storage cubes can be used as stools as well as bookshelves or display areas for figures or other items. Used as bookcases placed in a corner, it’s a neat way to create a ‘quiet’ nook for reading.
·Colourful coat pegs at child height offer more than just somewhere to hang coats. Dangle baskets or laundry bags to provide homes for small soft toys.
Bathrooms can be a little more problematic, but not impossibly so:
·A second shower curtain rod installed over the bath but close to the wall, and outfitted with a few S-hooks provides hanging space for bottle caddies or body buffs and loofahs.
·Fit upside down brackets (the decorative ones that normally go beneath) to the ends of shelves. They look stylish and help stop loose items rolling off or, in the case of stacked towels, draping over edges.
·Replace a full length mirror with one that doubles as a storage cabinet. Inside is yards of shelving for all your bottles and bathroom supplies.
Use the Vertical Spaces
We tend to neglect wall space above head height, but it’s prime real estate for getting creative with shelving. Layer shelves on top of each other for books or CDs and video games, instead of taking up room with floor standing units, or run a single shelf right around the room at picture rail height to show off groups of collectibles or photos.
Other vertical spaces we ignore are those around doorways, but these often narrow areas can also be turned into storage areas with bespoke shelving. An added charm is that the finished effect creates a recessed doorway look.
Find the Secret Places
All homes have them; you just have to know where to look. Two places you could probably make more use of include under the stairs and under the kitchen cabinets.
Stair cupboards can be dark and cramped, but you can hang hooks in there, run a couple of shelves, or buy a plastic drawer unit to help corral small items. Hang a battery LED light and the space becomes much more useful.
Those areas under the cabinets in kitchens are nearly always closed off with kickboards, but you can remove them and fit hinged or sliding doors instead. The storage space won’t give a lot of height, but it’s useful for long or flat items such as giant roasting trays you hardly ever use but need now and then, kids’ skateboards or bats, or even brooms and mops if there is nowhere else.
It’s all about finding spaces for awkward items so drawers and cupboards look neat and organised. When you’re showing potential buyers around your home, you can never be sure they won’t peep inside cupboards. And if you can show them a neat but homely house, they get the impression the place has plenty of storage and is comfortable to live in.
from Home My Heaven: Home Improvement Blog http://www.homemyheaven.co.uk/2017/11/clever-storage-ideas-to-help-sell-your.html
Hi. My name is Sarah, and I have a sad guest bedroom. Possibly, the saddest little guest bedroom of all time.
Even though other rooms in this house have been easy contenders for Longest Room Renovation Of All Time, the guest bedroom IS THE WINNER, in my opinion. Not because there aren’t still other rooms that need to be finished with a capital F, but because it’s never been functional. Other rooms have managed to still serve their purposes (somewhat) as I’ve worked on them, leaving my guest bedroom as my dark little secret. It has mostly served as a dumping ground for all of the things I have never had a place for (also things I intended to haul away to Goodwill, miscellaneous electronics, dog stuff, etc.), and to be honest, I haven’t really cared about it for very selfish reasons. Who could blame me, though? When you’re remodeling, you don’t invite people over. It’s too embarrassing and easier just to hide behind a closed door. So, with no guests invited, there were no guests to need their own bedroom… just extra space to “temporarily” put all of my Christmas decorations so I didn’t have to look at them anymore.
As luck would have it, I was visiting my pals in North Carolina recently while my boyfriend decided it was the perfect time to surprise me with cleaning it out. One, because he’s a neat freak and simply couldn’t take it anymore; two, because I was already taking out the Christmas decor and needing it for the holidays; and three, not having to clean something is totally one of my love languages.
I have been talking to K about remodeling the guest bedroom for the last few months. With the main level of the house now clean and remodeled enough to regularly invite friends over for dinner, the option of also having a nice guest bedroom seems like the next logical step when I consider the overall guest-friendliness of my home (Atlanta is a driving city as are most of the suburbs, so it always means someone needs to be DD or pay for rideshare if alcohol is involved, and I most definitely ply my friends and family with booze in my role as host… fire pits are just more fun that way!).
So, as far as guest bedroom friendliness goes… I have plenty of room to step up my game, here. With the recent cleanup, I also got an opportunity to take these before photos (I’ve learned just to shoot the room in lots of different angles just in case the before and after looks especially good from one side).
There are a few ideas I’ve been kicking around that I really think could do well in here, and I’d LOVE to get your thoughts on this blank space too, since there are a lot of decisions to be made:
“The Saddest Guest Bedroom” Improvement Plan (ish):
Paint… I’m not sure if I want to repaint or not. Or maybe add cool molding? This is a variation of a common color I’ve used throughout the house, but this particular version looks great on two walls and really terrible on the other two because of the light from the window and overhead light.
Speaking of overhead lighting, I think a ceiling fan would do best in here, but I hate the look of most ceiling fans. It will probably take a while to find the right fit.
In terms of my romantic life (and life in general), there are more people and dogs in it. Charlie has had a monopoly on this room as “hers” for a really long time (not planned, of course, but it also explains why she was curious about me being in the room in the video below). So, I’d like to make this room more friendly for K’s needs given how much time he spends over at my house now. Similar to how I work around the clock and on weekends, it’s not unusual for him to bring his work and computer over. The guest bedroom is the easiest space to use for this, since I work virtually everywhere else.
Even though the room is a “guest bedroom”, the actual need for it to be used as a bedroom is a much smaller piece of the room utility pie. So, if the bed itself could be tucked away somehow when not in use (such as a really awesome Murphy bed build like The DIY Village did below), that would be great. Even better if we could make the underside a couch when not in use. It would be a VERY ambitious project, but a perfect thing to try to figure out as winter limits my outdoor shed-building activities.
Adding in bookshelves on either side of the bed would also be great for displaying K’s vintage camera collection, my vintage maps, and photos from travels (how cool would that look???).
As many of you know, I run on a semi-regular basis with a group of my friends and would love to have a designated spot indoors for my related workouts. I think a foldaway area right in the corner (behind the door, so the least likely area you’d see when you walked in) would be perfect for a small set of shelves for the workout gear and yoga mat.
Finally, the remaining wall/corner could be a shelf/desk combo option where one of the shelves might slide/flip out at desk level to have double-duty but not stick out when not in use. Another DIY custom build idea, but another idea that makes my power tool arm itch with anticipation.
So… totally likely to happen quickly, right? Ha. It’ll inch by as my room realities always do, but if part of the issue with having a blank slate of a room like this is having a plan and the desire to get it done, I’d say I at least have that now!
“The Saddest Guest Bedroom” Video Tour
Since I’ve been trying to make good on my promise to do more video as I move along with these rooms and projects, here’s a quick “before” guest bedroom tour so you can take in all of its blandness. Charlie makes a cameo, of course (because whenever I make a video, she is curious why I’m talking by myself and assumes I must be doing something she needs to investigate). This is my first time embedding this particular video type into one of my posts, so if it doesn’t play or you aren’t seeing it in your feed, be sure to click over to the post or to Youtube if you have trouble and let me know!
Got any of your own thoughts on this room? I’d love to hear it!
I’ve been craving a cocktail that tastes like fall, and I think I’ve found it: this spiced pear manhattan with homemade brown sugar simple syrup is like having fall poured right into a glass.
So, the story of how I came up with my first cocktail recipe for the blog is kind of a weird one.
First, I was in a local restaurant chain called Marlow’s Tavern. My boyfriend loves their steak, while their “New Old Fashioned” is one of my favorite splurge cocktails (both in terms of calories and the fact that they aren’t cheap). They have seasonal menus as well, and about a month ago, I switched things up to try their “pear manhattan” — whiskey, pear liqueur, and spice. I loved it. The Georgia heat still hadn’t faded yet, so drinking this cocktail was about as close to autumn as I was going to get at the time.
Fast forward to these last few weeks, and I really got a craving for that pear manhattan again. I’ve been saving up for a very expensive trip to celebrate a friend’s vow renewal (first time I’ve used my passport since 2011!), so rather than rack up another bar tab, I decided it might be worth it to finally start learning how to mix these tasty things back at home. Even if the liquor itself might be more costly upfront, it’s better for my wallet long-term, and having things at home where I could serve them anytime definitely appeals to my wants-to-hibernate-all-winter side. :)
It didn’t really go as planned, however.
I found the exact recipe online and had no trouble tracking down the whiskey — High West Double Rye — and the bitters were a quick order through Amazon (affiliate).
The other two ingredients proved to be a little trickier. I couldn’t find a spiced pear liqueur anywhere nearby, and I really haven’t had enough opportunity to travel across town to find it. I also couldn’t find Cardamaro, and mostly had a lot of confused faces when I asked for help in the stores I went to (I’ll admit I was a little annoyed as a customer at all four of the places I went to — clerks not knowing their inventory, the puzzled shrugging at me because they couldn’t identify a good substitute, etc.).
So, I did what I always do when I get frustrated: did some more research, used a little ingenuity, and fixed it my damn self.
First, I figured out that Cardamaro was in the flavor/spirits family of Amari (if I’m even getting all of this new vocabulary right) — basically a group of herbal, sugary liqueurs with bitter notes on the end. So, that meant that even though it might differ from the exact flavor of the one I was searching for, I was in good shape if I could find anything in the ballpark. I found Cynar, which is supposedly more bitter than Cardamaro, but since I love a good hoppy beer (and sad songs), I know I can handle the bitterness just fine.
The other ingredient was spiced pear liqueur — of which, I could find exactly squat nearby. I did find a pear brandy, but since that is actually an ingredient in what makes a spiced pear liqueur, it meant that I would need to make the liqueur homemade, or else the cocktail would be all booze (not that I tried it like that, coughcough).
To make the liqueur, I needed to mix the brandy, pears, spices, and simple syrup… which I also didn’t have. But I figured that since simple syrup is just a 1:1 ratio of sugar and water over heat, that would be the easiest part.
Except, upon looking through my pantry, I didn’t have any regular sugar. I only had brown sugar. It was old and needed to be broken up before I could actually measure it out (holy hell, this cocktail better taste good).
At this point, I was both more determined than ever and also laughing at myself on these obstacles. I’ll post the final spiced pear liqueur recipe separately once I get it just right, but since it’s also supposed to be pretty good with fruit and ice cream, there’s no harm in posting about it twice (once I do a few taste tests of said ice cream dessert, of course).
Anyway: brown sugar syrup, then mixed with brandy and another pear, then allowed to steep for a little while in a mason jar. I learned that simple simple syrup (with no fruit or spices added) actually lasts much longer than when it’s flavored, so I’ll have to try that next time.
After all of that, I most definitely needed a drink. As it happened, I had one ready to go. ;)
2-3 cloves, 1 cardamom pod (skip if you added spice to the liqueur)
Instructions
To make the simple syrup
Over medium heat, add brown sugar, water, and pear.
Let simmer and stir until the sugar is dissolved (about 5-10 minutes)
Remove from heat and let cool.
To make the liqueur
Take simple syrup and pour 1:1 ratio into container (I used a small mason jar) with pear brandy.
Add another diced pear.
Let steep for a few days in the fridge.
To spice: add cinnamon stick, cloves, cardamom, or other spice of your choosing (such as star anise, nutmeg). Leave these in for just a day or two so as not to overpower the pear (you can also mix these in directly into each cocktail if you don’t want to spice the liqueur).
After a few days of both the pear and the spice steeping, re-pour into another glass container using a filter (coffee filter, strainer, etc. — whatever will catch the chunks of stuff and leave just the liquid behind).
To make the pear manhattan
Mix all ingredients into a shaker with ice. If you decided to spice per cocktail instead of in the liqueur, make sure the shaker has a strainer so it catches the spices.
Shake and pour.
Garnish with sliced pear, maraschino cherry, or lemon zest.
Notes
For my recipe, I used Seckel pears… they are tiny and sweet and are great just by themselves, so they made for a great prop and garnish too (because I could eat the rest).
I gave you both options of steeping the spice and just adding it to the cocktail because I started mixing this when it hadn’t fully gained all the spicy flavors from sitting in the fridge. I wanted to try it early, so I added the spice directly into the cocktail for a quick boost of the spice flavorings.
Remember that the spices will get stronger as they sit in the liqueur, so if you’re not a fan of strong spice, remove earlier.
Since the simple syrup apparently goes bad weeks sooner if you mix the pears and spices directly into it, you can always keep it separate and put equal parts simple syrup and pear brandy into the cocktail.
Every time I’ve mixed this, it’s only gotten better!
With these shots, I think you can kind of also see the evolution of my learning how to work lighting around a smaller object (since normally I take photos of DIY and rooms, taking food pictures is like learning how to take blog photography all over again… not that I was an expert at it before).
Not to mention, working during the winter (getting dark around 5 now!) and with my only source of natural light at the kitchen window, having the space to really capture color and texture is a lot tougher than it looks! I want to work on making the light a little softer in the future, but overall, it turned out as I wanted: it tastes just like fall.
The cocktail also looks pretty snazzy, if I do say so myself. Do you have a favorite fall cocktail?
P.S. For more cocktail ideas, you should check out my contributors, Biscuits and Burlap, who are sharing some of their ideas periodically on this blog as well in my Recipes section — to keep us all well-imbibed during this awkward-family-interaction season. ;)
Looking for fresh ideas to update the look and feel of your living room? We’ve put together a couple of ways to get you started.
1.Hand Up Large-Scale Art
Why not create an incredible focal point and give your living room a true wow factor by hanging up an oversized piece of art? You can hang the art up by itself on one of the living room walls to draw attention to it. This look gives a high-impact and ultra-chic effect to any lounge, with very little hassle. You don’t have to spend a fortune, either – scour the flea markets and thrift stores of large pieces and prices you are happy to pay. Or, if you are creative, you could always create your own work of art and stick to a tighter decorating budget.
2.Downsize on the Clutter
An over-accessorised and cluttered living room can look disorganized, dishevelled, and downright messy. Instead, you can create a sophisticated and chic look by paring down your collection and retaining the pieces that have the greatest sentimental value or those that evoke strong emotions. A more simplified space will leave the remaining pieces to really shine, and it can help to keep you on budget. If you want to add a focal piece of furniture, you couldpurchase Moroccan furniture in Australiaor in your local store to create a rustic, sophisticated, and highly-polished look and feel to your living room.
3.Consider the Television
Nothing quiet brings down that feeling of chic sophistication and luxury in a space quite like a great big, black television placed right in the centre of a wall in your living room. If your budget can’t quiet stretch to elegant mirrors to conceal the television, you could try to visually minimalize the presence of the screen by creating a salon-style art arrangement or even a gallery wall around it. While it won’t make the screen completely disappear, the frame of your TV will better blend into the background with the artwork, therefore distracting the eye. This is a great idea that works well on a budget.
4.Make Good Use of Textiles
Tofreshen up the lookof your living room and create a custom look, consider using antique or vintage style textiles to make beautiful throw cushions or cover small pieces such as upholstered stools and seat cushions. You could also add an antique Turkish rug on your floor as a cost-effective and simple way to instantly create intrigue and interest. The unusual and vintage-type fabric will inject the room with a really unique look and feel, therefore personalising your space. Another idea is to add a textural throw to a piece of furniture, be it a char or sofa, to really ramp up the cosy factor in the living room.
Those are ways on how to update the look of your living room. Follow any of those steps and transform your living room from boring to stunning!
from Home My Heaven: Home Improvement Blog http://www.homemyheaven.co.uk/2017/11/4-ways-to-update-your-living-room-on.html
Hey everyone! It’s Lindi, back again from Love Create Celebrate to share another quick DIY project. Last month I shared my first project, which were these fun square napkin rings, and this month I’m getting dirty with concrete! Have you noticed concrete decor sneaking into homes more and more lately? I can’t get enough! I love the look of concrete pieces. When done in the right way, a concrete vase or coaster doesn’t have to be cold, but can look sleek and modern! Just like this stylish soap dish or this modern concrete candle.
Affiliate links are provided for your convenience. Purchasing through these links helps support my site AT NO COST TO YOU and lets me share more projects and plans! Thank you!
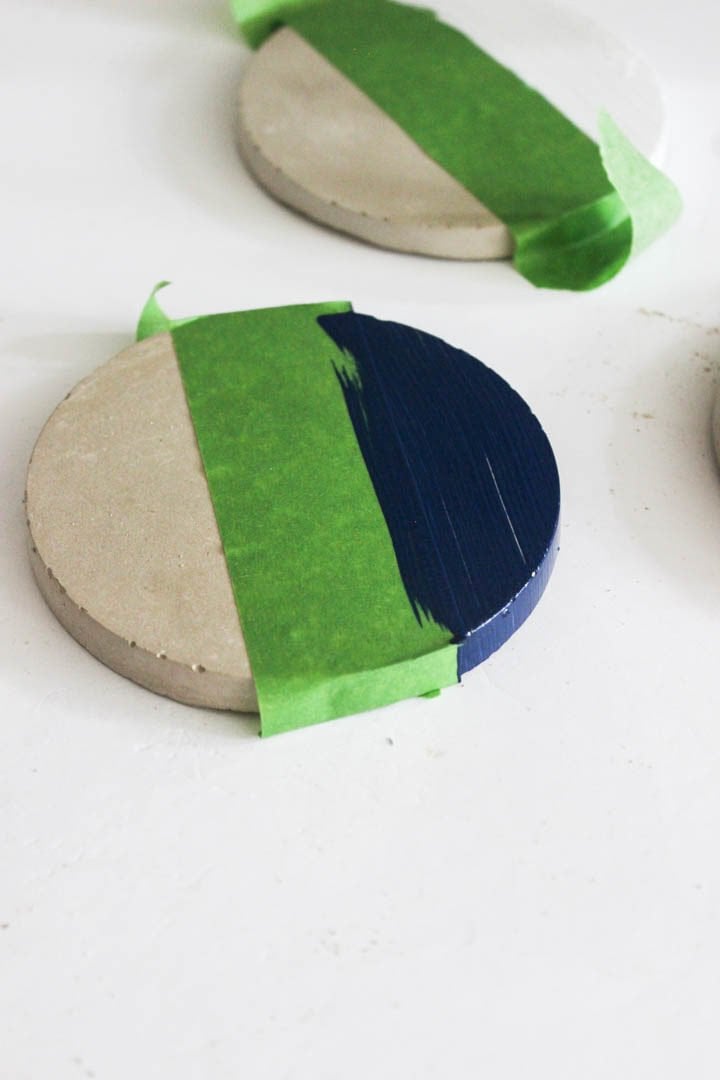
How to make your concrete coasters:
Start by mixing your concrete with water in a bowl according to the directions on the package.
When you get a smooth consistency, pour the concrete mixture into your molds and shake the mold lightly, until the concrete sits flat.
When the concrete is ready, about 45 minutes later, you can pop them out of the molds.
Use a concrete sealer to seal and protect your coasters from future, inevitable spills.
If you want to add some colour, you can use painter’s tape to mark out lines and paint a section or two. I used my favourite Americana Decor colours :)
To protect your table surfaces, you can add felt pads, that you can find at any hardware store, to the bottom of your concrete coasters.
I love the end result! What do you think? Could you see yourself using these guys? I might just make a few extras for Christmas gifts this year :)
If you’re a visual learner (like me!) you might enjoy this quick video of the entire tutorial :)
To those of you who don’t know me yet: welcome. Everyone else has already started drinking and saying really embarrassing things (about themselves, not you… we’re not a super judgmental bunch). To those of you who already know me: cheers. As always, you rock. And I was just kidding about the drinking thing (unless it’s football season and a Saturday, which yes to both).
Anyway, from time to time, I like to throw my hat in on a DIY challenge or two because nothing excuses buying more power tools like overcommitting to a deadline for fun (like the 2×4 summer challenge and boom: new coffee table!). This time around, the theme was making something for Christmas. I’ve already been finding inspiration for my color scheme this year in the form of acorns, snowflakes, owls, and other wintery-woodland things, so I figured: why not see if I can fill up the inevitable empty parts of my tree with what I have on hand, rather than buying a bunch of new ornaments? I also just happened upon a set of carving bits for my Dremel and have been itching to experiment with epoxy/inlays/resins, so I started playing around until this happened:
And as a fun little bonus: I actually made a video of it too!
Tools and Materials
affiliate links of items I recommend and use are listed in this post, which support this site at no cost to you… thanks!
wood stain (I used Minwax Ipswich Pine and washed while it was still wet with Early American… I’ll have to show you guys more about this as I’ve done it a number of times to get the colors I like)
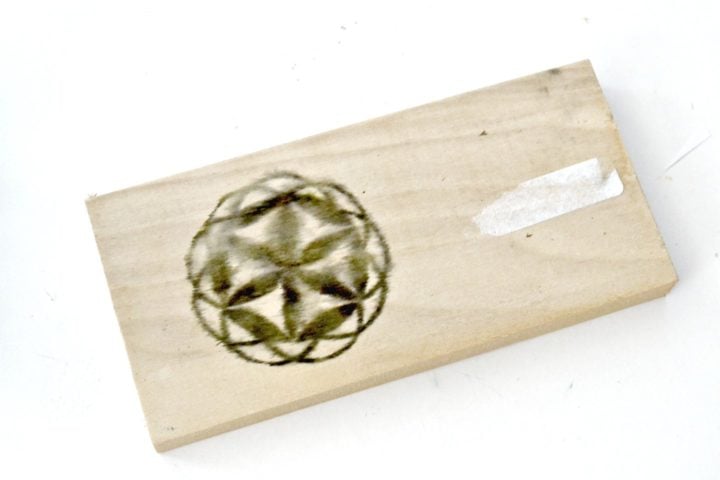
First things first: print out the image (mine is available for download near the end of the post) and cut it out. I used a scrap piece of poplar that was bound for the burn pile, so I wasn’t really expecting perfection (in fact as you can see, I first used a different image that was WAY too intricate for a first-time experiment and then decided on the final design).
To transfer the ink from the printer paper, I swabbed the back with an acetone nail polish remover. As you can see, the image didn’t transfer perfectly, but it was good enough (I got the idea from my buddy Brad’s video here — then went with the option that wouldn’t require changing out of my pajama pants or going into the cold garage that morning).
Next, I took out my Dremel and a new engraving/carving set I’d recently purchased for another inlay project. In my opinion, crafting is a good intro before graduating to larger pieces, so I figured this would help me practice with diamond tips, how to control the carve, etc. A good method is to create the hard outline first, then carve out the middle, and continue to make the inlay deeper and deeper until it’s got enough depth to hold the inlay material (glitter, epoxy I assume, whatever).
Next, I sketched out the overall shape (spoiler: it wasn’t at all even, so I highly recommend using the template) and then went to cut out the piece. And this is when it seemed like things were conspiring against me: my new scroll saw was broken… right out of the box. Womp, womp.
To make the situation a little stickier, I was about 5 hours away at this point from needing to head out of town to Raleigh, NC (recap here), and I had no other tools that would give me the right depth and shape. Disappointed but undeterred, I figured the next best thing would be to ask to borrow tools from the person I’d be visiting (thankfully, it was a trip to visit some DIY blogging friends just for fun — my pal Brittany just so happened to have a band saw in her garage). Of course, now I want one of those, too.
Of course, I’d never actually used a band saw before, so despite the general don’t-cut-your-fingers-off rule, the piece still came out a little wonky (mostly due to my non-templating sketch). I was able to shape it a little more with an orbital sander. I also carved the edges out a little more and did a final sanding with high grit sandpaper before stain.
Since the overall concept was to make this look like an inlay, I wanted to use glitter with a little more grit and sparkle: enter, German glass glitter. It’s really amazing stuff in person. To paint it into place, I relied on a small paint brush (tip: if the brush starts to fray a little, spin it as you’re dipping it into the glue to get the point fine again… check out my video to see a demo of that).
You can layer the glitter in, too: after giving it some time to dry, paint another bit of glue on top of the glitter and add more into the recessed areas. It will add depth!
I added extra-fine gold glitter around the edge and sealed the whole thing with a clear gloss spray, then drilled a hole through the top and threaded it so it could hang on the tree.
Caveat: before I sealed with a clear gloss, I actually tried to seal with an old polycrylic which unfortunately made the top and bottom tips look faded/cloudy once it dried. At first I thought I’d lean into the mistake by painting the back and sides with chalk paint and sanding to make it look rustic, but it looked really sad instead and totally detracted from the sparkle on the front. I wanted to get this done in time for the blog hop, so I just continued on with sealing again and adding the glitter around the edge. So, if you try a project like this, don’t make my mistake and you’ll get even better results!
You can also try other inlay methods, other glitter colors, fill in the center vs the outer rings with opposite hues, etc… the possibilities are pretty endless!
All in all, I think it’s going to make a nice addition to my white/gold/chrome/woodland Christmas decor theme this year (and the less I need to spend on ornaments, the more budget I have to make Christmas cocktails, hehe).
Want to try this for yourself? You can download my template here.
To be perfectly frank, I think the photos really don’t do the sparkle on this piece enough justice (in fact, I worried that it was looking too drab in photos). So, I made a video tutorial too (I’d love it if you subscribed if you haven’t already… with what I’ve learned in making this tutorial, there is more to come no doubt!).
As I mentioned, this DIY was part of a blog hop, with 25 other bloggers participating — aka, enough DIY Christmas ideas to keep you busy right up until the actual holiday (if you were so ambitiously inclined). So, check out a preview of the other projects and bloggers participating in the images below. You can also head over to the Remodelaholic post (who is hosting this hop) to check out other DIYers submitting their inspired ideas (on social media, you can look for #CreativeChristmas to find them all).
Those of us who did videos for this hop can be found in the playlist below, so those of you who would rather watch than read (or just want to blow off work for a few more minutes) have something, too! *If you’re having difficulty playing it, you can jump over to the playlist here.*
There you have it! Hope you’re getting into the holiday spirit just in time. Will you be working on any decor ideas this Christmas? This is going to be a very busy holiday season for me, so be sure to check back in for more DIYs (I’m going to give that epoxy inlay idea a shot, and a few more scrap ideas are just bubbling in the ol’ brain). Have a great weekend!