Monday, 26 March 2018
Wednesday, 21 March 2018
Dueling DIY: The Murphy Bed Build and Hanging Plants
It’s Wednesday once again, and that means it’s time for another Dueling DIY: Guest Room Gauntlet update!

On the last update in this series, I hadn’t really made the huge strides in the Murphy bed build that I was hoping for. I finished the wall paint in the guest bedroom (Sherwin-Williams Retreat), which at least looked like a significant change (as paint so often does), but the to-do list still seemed impossibly long. Paint or no, I was going to have to step it up this time around.

As you guys already know, the whole point of a Dueling DIY challenge is to create motivation in the most mature way possible: by one host rubbing their progress in the other person’s face. For me, seeing how little I completed in the last update compared to Charlotte building a freaking daybed in the interim really put a fire under me. I almost don’t believe it myself how much things have changed in the last two weeks!
Picture Ledge Install 

I finished the picture ledge install! Even though you only see three here on the wall, I actually made a total of four. As I began to space them out, I quickly realized the fourth would run too low to fit a desk underneath, so it had to be nixed.

I still wound up using the fourth — just on the TV wall. Adding it directly under the television will be the perfect spot for the remotes (there are two for the TV and one for the new ceiling fan).
Murphy Bed Pieces Built
I suppose I could have called that “enough” for an update, but I wasn’t content to stop there. Just as I hoped for with this DIY battle, I kept going!. The idea of her finishing and me still having a bedless guest bedroom was just not going to happen, so I got the last of the plywood pieces I needed to assemble the Murphy bed. The whole thing will come together in basically three big parts, which have to be built separately first. It was somewhat of a building frenzy for a few nights as I glued, nailed, and/or screwed everything together.

I got as far as adding the veneer edge banding to the exposed plywood edges with my clothing iron before needing to make yet another trip to the store. This time, though, it was for paint — a sure sign that I am SO CLOSE to having this thing fully installed! Some of the areas are going to be really difficult to reach once installed on the wall, so I am going ahead with painting things while it’s still on the floor.

Hanging Plants by the Window
While I was at the store, I happened upon these cute little planters with neon thread. Even though I originally intended on doing a macrame project for hanging plants on my custom-made curtain rods, these seemed like a perfect way to add more color. So, I switched gears and turned these little guys into hanging plants.

It’s a fairly simple tutorial, so I thought I’d go ahead and include it in this week’s post. Enjoy!
How to Turn Small Planters into Hanging Plants

1. Gather your supplies: some twine/rope, scissors, and a hanging planter that be converted easily (these were simple plastic and cardboard; for wood, you’d have to drill through using a drill bit; for something tougher like ceramic, you’ll have to buy a special bit to drill through them and use a technique similar to this tutorial from my laundry room makeover).

2. Since I could skip the wood/ceramic drill process, I separated the plant out to its components. Find the placement for each hole on opposite sides of the planter.


3. Using a very sharp pair of scissors, poke a hole in one side (enlarging the hole and twisting the blades through). First through the cardboard planter piece, and again through the plastic liner. Repeat on the opposite side.

4. Using the same scissors as a poking tool, feed the rope through the first hole, starting at the outside of the planter and pulling through to the inside.
5. For the knots, follow the image directly on the bag (middle illustration). I made two of these knots per side, then a standard knot like tying a shoelace to help the knot stand upright above the rim of the planter.

6. Cut the rope to the desired length with a little extra to create the knots on the opposite side. Repeat steps 4 and 5 to finish the second hole.

7. To make the top loop for hanging, fold the rope so that it’s equal on both sides, then wind it around your finger three times. Pull the end of the loop through this wrapped section to create a knot.

8. Cut excess rope from knots, put the plant back in, and hang. In my case, I created two different lengths of rope to make my planters hang at different heights beside the window. I think this will look more interesting, but it’s a nice perk that it also meant I didn’t have to measure or match up the lengths. I may even go back and grab two more and do it again so they hang in clusters.
That’s it for this week’s update! By the next one, I am really hoping to get the Murphy bed fully installed in the wall. And if I’m feeling ambitious, I may even try to start building out the cabinet boxes that will go on either side. Don’t forget to hop over to Charlotte’s blog to see the new changes she’s making to her guest room. I would say something positive about her room to be a supportive friend or whatever, but pfffft. I totally rocked this week, and she knows it.
The post Dueling DIY: The Murphy Bed Build and Hanging Plants appeared first on Ugly Duckling House.
from Ugly Duckling House https://www.uglyducklinghouse.com/dueling-diy-murphy-bed-build-and-hanging-plants/
Monday, 19 March 2018
Welcoming Spring (and the Most Gorgeous Roses I’ve Ever Seen)
Spring is arriving in full force in Atlanta. For this house, that also means COLOR.
I have an early spring habit. Every year, I tell myself that I need to be patient and wait out the month of March. Because in Atlanta, March will get blissfully warm for several weeks, starting near the end of February. But it’s a trick. A stealthy, mean trick.
Just when I put full faith in the weather that spring has finally arrived, that I should be prepping for spring gardening — that’s when the last freezing bit of weather comes around and threatens to ruin everything.
But do I actually listen? Noooooope. Every year, I get so excited about adding COLOR to the yard that I skip ahead. This time though, I let the purple phlox I planted several springs ago to give me the go-ahead:

And just as I wanted the creeping phlox to do, it’s been spreading and filling in, practically blanketing the entire bed!
(P.S. I decided I’ll be adding photo cards like the one above for my plants throughout the year so you can pin them and save them for garden ideas. I have had so much trial and error in certain parts of the house that these will be handy for new gardeners who are looking for easy-care ideas.)
After eight years of practice, I guess I’m getting pretty decent at keeping plants alive. But I’m not going to stop there. Of course not, right? Gotta up the ante and challenge myself. This year, I want more than hydrangeas and phlox and shrubs. I want roses.
The side garden: finally figuring things out
One of the things I’m most anxious to get in the ground are these gorgeous multi-colored roses (“shrub trees”) that will go along the side of the house.

Those of you who have followed for a while will recall this area, but probably only after seeing another picture of it:

The garden area next to my house has been one of those long-term, dangling projects I just haven’t been able to figure out. I’ve given it a number of attempts, tried with some discount plants, but never a proper “plan” for what to do. It’s long, and narrow, and it runs along the pathway that separates me from the neighbor’s fence and goes to the backyard gate. It also gets full sun, which gives me a lot of options. Too many, maybe? Perhaps that was the cause of my indecision all along.

Last spring, I made a practical upgrade by inserting a cement slab for the trash can and recycling bin. As of this year and with K moving in, the recycling got to a point where I needed a second full-size bin rather than a small container. The slab was the perfect size!

But obviously, this isn’t exactly charming to see at the front of the house (you can actually see the first section of this side garden from the street. I chose this spot, though, for other reasons that I covered back in this post). So, the only real “plan” I had in place began a couple of years ago when I made a frame for a wooden screen (intending on using it to hide the bins once the slab was in).

I finally finished it and installed it in the front, which perfectly hides the slab and two full-size bins. This is one GIANT leap in the right direction for this garden.


And wouldn’t ya know it? I figured out one of the biggest obstacles the yard has had for years, and boom: the very next week, my side garden got the burst of inspiration it was desperately needing.
The other day, I saw these beautiful roses at Lowe’s. They are two different varieties, but they have grown together in a single pot, producing “white iceberg” and “burgundy iceberg” flowers simultaneously. They are fragrant and full of buds and ready to be planted. Gorgeous, right? I got so excited, I bought all I could find at the store.

Over the weekend, I planted all that I bought, but I underestimated how many I’d need. I’ll have the full before & after of the garden when I gather up a few more and get them in the ground.
Starting a veggie garden!
Another first: K has been insisting we start a veggie garden (for over a year, actually). So, we bought the seeds, the starter stuff, and are going to build a couple of garden beds for the backyard, near to where the shed is going in. I’ve never grown my own food before (my parents had a small garden but I didn’t really work on it with them), so I’m pretty much letting K take the reins until things start to grow. I’ll admit, I’ve already had a lot of fun watching the little starter pods expand and putting in all the seeds (I’ll go through the whole process once they’re ready to transplant… a few look like they’ve already started to seed so that should be just a couple weeks!).

So, I guess that’s 2 projects down, which were immediately replaced with 2 more? The way it goes, I guess. There are several other projects that are also in various completion stages too (even if you’ve seen some of the posts on Instagram, you’re in for a treat on Wednesday with the Murphy bed update for Dueling DIY!). Are you anxious for spring, too? I feel like I’ve been stir-crazy all winter, so I’m hopping from project to project just as fast as I can. Are you getting a chance to plant anything yet?
The post Welcoming Spring (and the Most Gorgeous Roses I’ve Ever Seen) appeared first on Ugly Duckling House.
from Ugly Duckling House https://www.uglyducklinghouse.com/welcoming-spring-and-the-most-gorgeous-roses-ive-ever-seen/
Tuesday, 13 March 2018
The Guest Bedroom Picture Ledges are Done!
The picture ledge shelves in the guest bedroom are not only built; they are DONE!
Hiya, folks! Hope the time change didn’t suck you into the void of insomnia like it has me (ugh, will I ever have this sleeping problem fully resolved??). But, in other (and much more DIY-happy news), the picture ledges in the guest bedroom are officially COMPLETE!
I’m going to say that again, because it so rarely happens around the UDH: I finished a project.
- Built.
- Holes Filled.
- Sanded.
- Caulked.
- Mounted on the wall.
- Caulked again.
- Painted.
Everything always seems like it’s in some sort of stage of completion around here. I usually get to somewhere along that list, but never all the way to the bottom. So this one is a moment to savor.
Picture ledge shelves that let the art stand out
As you can see from this closeup shot, I built them a little differently than the shelves I made for the stamp collection in my office. Same general principle (thin 1x-boards screwed together), but I chose this time to go with a rounded edge and to make them the same color as the wall. This makes them almost invisible and lets the framed art be the star, but I like that I can switch up the order/size/quantity of the art whenever I feel like it.
The art, of course, is another story as far as its completeness. I still have to do some arranging. However, given that I have so rarely put art up on the walls around this house, I’m very happy to have a destination for the framed art I’ve been holding onto but haven’t had the patience to hang.
Before

After
I’ll show you all about the specific details of how I made them in a future post — this one is merely just me doing a happy dance that something was completed. This is kind of my version of “stopping to smell the roses” by not adding the plan-making part to my to do list yet. I also took video of the whole thing, including me building these guys on the floor of the guest room and painting the first coat in my bathrobe, so that should be a good laugh for most of you guys when all is said and done. 
I figured a “real life” version of how these were made is the best policy, instead of trying to stage something like a pro. Many of the tutorials I see these days are done in pristine workshop environments or photo shoot setups. So, in other words, this tutorial will be for the rest of us who make it work, Tim Gunn style. Sawdust and clutter and all.

Want other guest room related project updates? Be sure to check out the Dueling DIY series… every two weeks, I’m updating with full recaps of progress.
Speaking of roses and not to get completely off-topic (because that’s so unlike me, right? ha!), but the sun has been coming out and it has me very excited about spring. I’ve already planted a couple of things. These are next!
That’s what’s coming up in the very next post, including more updates to the hideous non-garden on the side of the house (the one where I put in the cement slab for the trash cans last spring, if you recall). Any rose tips for this newbie before I plant? And do you have any spring plans yet, or is it still snowing where you are?
The post The Guest Bedroom Picture Ledges are Done! appeared first on Ugly Duckling House.
from Ugly Duckling House https://www.uglyducklinghouse.com/the-guest-bedroom-picture-ledges-are-done/
Sunday, 11 March 2018
Wednesday, 7 March 2018
Dueling DIY: Dark Sage Green, Curtains, and Vlog #2
My friend Charlotte and I are in a DIY battle to renovate our guest bedrooms. Catch the entire series here.
Hey friends! It’s Wednesday, and that means it’s time for another Dueling DIY update on the guest bedroom’s progress!
If you need a recap, start here and check out the update here. As promised, I also have vlog #2 for those of you who want video updates at the bottom of this post.
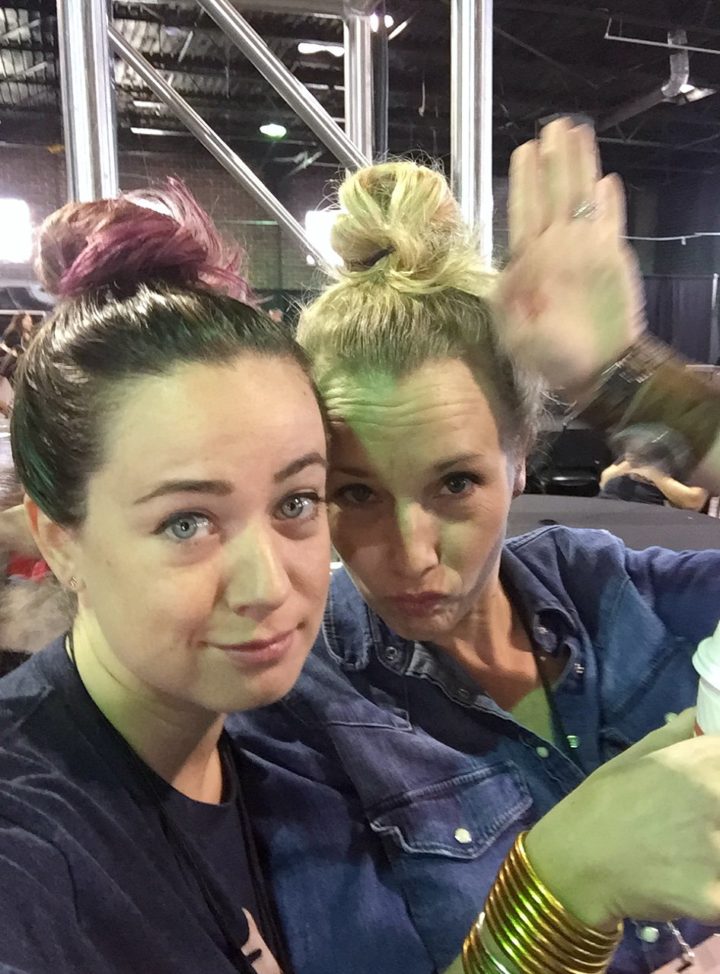
My guest co-host for this Dueling DIY series is Charlotte from At Charlotte’s House, who is working on a daybed and a few other (BORING) projects in her guest room as well. BUT, don’t let her post make you think that she’s finished… she may look like that bed is styled, but I know it’s missing all of the upholstery and she’s just trying to make it LOOK like she’s gotten a lot further than she really has (pssh, you think a pillow’s gonna scare me?… lame). Again, expect this to be Charlotte’s face when my Murphy bed is done:

I’ve been keeping up with her progress mostly through her Instagram stories, but we also got the opportunity to see each other recently at a conference in Atlanta called WorkbenchCon. We enjoyed each other’s company (mostly) and put away our smack talk for a little woodworking fun… and making faces.
Truth be told, I knew she was getting a lot done these last two weeks and felt very behind. That is, until this past weekend. Things have really started to fall into place!

Out with the old!
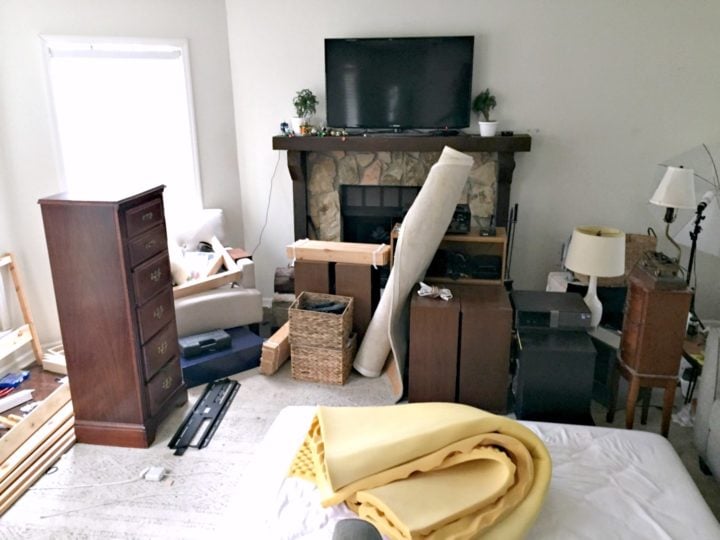
First, I had K help me move out all of the old furniture, I broke down the old bed, and put the mattress in the living room. While we still kept the big TV in the bedroom, we took it down from the walls so I could do some painting.

A moody sage paint… right on trend
Ready to see the new color?

Obviously, that’s just coat #1; there was a second, and that wall on the right had already been painted as of the last update (the same color will also be used on all of the trim work of the built-ins).
I always get questions regarding paint colors about six months after publishing a post, so let’s go ahead and put that in bold for that inevitable random website visitor who just wants that info (by the way, hi, how are ya? I hope you found this site while bored at work and decided to stick around; we talk about DIY and squirrels and other things, and try not to take ourselves too seriously):
The dark sage green paint color is Retreat by Sherwin-Williams.
Got it? Sweeeeet.
Murphy bed hardware is in! Building has begun.
If you recall from the mood board and the last update, I’m planning on doing a whole wall of built-in storage, complete with a Murphy bed. I hadn’t yet announced the reason for that design in the original post, but after sharing the news that K and Stella officially moved in, it probably makes more sense now! This room will serve double-duty as K’s home office and house a lot of his personal collections (he has a bunch of cool vintage cameras, for one). We had a lot of things to consider for how to best use every square foot, so the Murphy bed/built-in situation is perfect for providing plenty of room for an office and keeping the bed tucked away until it’s needed by guests.
And, speaking of this big project, the Murphy bed hardware arrived in the mail, along with jigs and cabinet hardware (Rockler, very generously, is now sponsoring the project and sent me all the hardware I’ll need to install). To start the build, I had to make the bottom frame and side rails, which takes us all the way to page 18 of the instructions. It’s pretty much one of those things you want to make sure you get right (very dangerous if you don’t!). So, I’m following the install very closely and will have a full post all about that for you when I’m done.

Curtains
Do you like that TV placement, right in front of the only window and source of light in the room? Yeah… kind of awkward, but it’s the best option while everything else goes in (most of the old stuff will be sold/given away, but the TV is staying!).

And do you want to know some UDH trivia? Those curtains above are the first official curtains I’ve hung in the house. It took eight. years. Other than the faux Roman shade over the kitchen, everything else has been blinds! I have them hung, temporarily, to see how much I’ll need to hem (still working on finishing the curtain rod). I’m not really crazy about the tabs at the top either, so I may end up snipping them off and using the top hem instead.
Picture Ledges
Just last night, I began yet another DIY in this room: the picture ledges that will go on the wall next to the door. The plan is to vary the spacing between the shelves so I can have lots of different frame combos. These will be a different version than the ones I installed in my office for my craft stamps — mainly that the front lip is created with a piece of trim molding instead of a 1×2. I’ll still cover this in more detail when I have it fully installed and styled. Like, with pillows or some crap. 
A word about the paint
Normally, I find a color of paint I like and then color-match it to a paint brand I know well (BEHR and Olympic have performed relatively well for the price for me). But this time around, I decided (just for the heck of it) to try out a new-to-me paint line called Ovation (HGTV Home by Sherwin-Williams). Since part of what I do on this site is try out new DIY products, I like to know about paint lines and how they perform (coverage, flashing, streaking, cost comparison, etc.).

To be honest, while I love the color, the paint itself performed just ok… nothing special, but got the job done. The paint was somewhat thick, but left a lot of bare spots and streaks on the first coat, and the second coat appears to have given full coverage. Since it was a little higher of a price point than my go-tos, I expected a little better performance, but it’s not like it peeled off my walls or anything (that has happened when I was asked to review a paint line once, many years ago; as you might expect, I declined to publish about the brand after that!). For two walls, I used a little over half a gallon, so I’m not 100% confident it would have allowed me to paint the entire room with just one gallon (for comparison, the size of this room would normally need one gallon with the other brands).
Vlog #2!
When I originally posted about the new Dueling DIY setup, I also mentioned that I’d be doing regular vlog updates to share more thoughts about my progress in the room. So, here’s that video! There may be a clip as well of me dancing as I paint the room. As K would describe it, I’m practicing a lot of my “white girl” moves. 
That’s it for this week’s update! More DIY ideas are well on the way!

Don’t forget to go over to Charlotte’s blog to see more of her progress, tease her a little on my behalf, or just tell her the bed she’s worked really hard on all week looks like a pile of dog vomit (kidding, don’t say that… just secretly think it). Hope you’re having a great week so far!
The post Dueling DIY: Dark Sage Green, Curtains, and Vlog #2 appeared first on Ugly Duckling House.
from Ugly Duckling House https://www.uglyducklinghouse.com/dueling-diy-guest-room-paint-vlog-2/