Tuesday, 27 February 2018
Wednesday, 21 February 2018
Friday, 9 February 2018
Wednesday, 7 February 2018
Dueling DIY: Guest Room Gauntlet!
Dueling DIY is BACK! Between talking shit and getting shit done, I’m bringing back my favorite DIY series to face off with another master DIYer and give my guest bedroom its official makeover.
You’ve heard me hinting at it over the last few weeks. I said I would be bringing my Dueling DIY series back, and today is the official launch date! This time, it will be bigger and more badass than ever, because my friend Charlotte (from At Charlotte’s House) is absolutely PERFECT for the role of soon-to-be-beaten guest host.

With SO much going on over the next few months, I quickly realized that the guest bedroom project will quickly slide to the back burner if I don’t keep my focus. So, much like I’ve done in the past with other Dueling DIY sagas, I’ve brought back this reader favorite so I have more motivation to get ‘er done.
The backstory
If you don’t already know about Dueling DIY and what it’s all about, I’ve got the full info for you right HERE. It all started a number of years ago when I was neck-deep in 247 projects with no end to my to-do list in sight, and I desperately needed to refresh my focus. Sometimes, my project A.D.D. gets the best of me, and my ambition and the number of hours in the day just have no hope of overlapping enough. It starts to feel like I’m working and working, but nothing is being achieved. In truth, there is also a limit to how fun fixing drywall is when a second season of Stranger Things could use rewatching.
That’s where a challenge like this comes in. It helps me regroup, start making actionable goals, and really make some progress. Because there’s nothing like having your friend send you memes of how she’s kicking your ass with her own home’s progress to make you feel like a lazy chump and get you painting walls again!
First things first: the smack talk is the best part…
The fact that I get to talk a lot of shit at another blogger is, frankly, the best part of this whole thing. This challenge not only forces us both make progress on similar room/space, but also adds in a thick, delicious layer of friendly — but snarky — banter. To keep it more apples-to-apples in terms of challenge, it’s always the same project type (staircase vs. staircase, kitchen vs. kitchen, and this time, obviously, guest room vs. guest room!).
Schedule: every other Wednesday
Since Charlotte and I both have eight billion other things going on (and in just a few weeks, we’ll see each other in person at a DIY conference, so I hope we’ll have time to do a Facebook Live or something), the schedule won’t be every week like it was in previous years, but every other week. This will let us fit in the other DIYs that aren’t related to this room (I still have the shed and the master bedroom stuff going on, plus some other kitchen updates).
The goal: finish and fun
As with previous versions of this series, there is no official end date picked ahead of time. It’s meant to give the both of us something new for you guys every other week, which is plenty motivation by itself. Someone finishing first still offers plenty of bragging rights, so that threat is always looming. Maybe this time, I’ll actually have to send Charlotte a golden hammer… or maybe I’ll be a THREE TIME CHAMP.
Vlogging progress, too
As you guys already know, one of my goals this year is to mix in video with my DIYs and tutorials. It’s meant to complement the posts I write, but not replace them (like many of you, I like written tutorials and don’t plan to abandon that for video anytime soon). So, a vlog will pair with this series once a month on my Youtube channel for anything I think I can add in for the update (especially clips of me laughing at Charlotte’s defeat). I think a series like this lends itself perfectly to video… personality is such a huge part of what makes a challenge like this so fun!
You can catch my whole intro vlog describing the series for new followers, plus an updated tour of the guest room from where it was a couple of months ago (which happens to have a lot of K’s stuff in the room, coughcoughfuturepostscough) here.
And, you should also check out Charlotte’s first post and vlog about her room here (and while you’re at it, make sure you’re subscribed to both of us so that you can catch all video updates).
Subscribe to my Youtube channel here
My guest room inspiration and plans
That’s the whole series plan in a nutshell, but what I haven’t covered yet is the actual room plans! Here’s what that’s currently looking like in my head:
contains affiliate links

Sources (clockwise from top left): ceiling fan / macramé hanging plant / paper shadowbox art / office swivel chair / paint colors: Sherwin-Williams Retreat and Stone White / rug / faux fern / wall sconce / black and white pillow / leather pillow / tassel throw
One of the biggest projects, as you can see, is the custom Murphy bed setup that will hide the bed when not in use. This room will serve double- or triple-duty as office space for my favorite bearded dude and his design work as an engineer (in fact, he’s the one who is drawing up these Murphy bed plans to turn my 2-D drawings into 3-D plans for you once we’re finished).
I’m also sticking to a really simple color palette and adding visual interest via texture. Lots of global-inspired textiles, keeping the room comfy, with a sort of eclectic influence. And of course, my favorite black and white combo! I figure this will be the best palette for allowing the multi-use space to be calming for guests and clean for every need this room will serve (but still refreshing with plants and visual interest). I haven’t really picked out art yet, but I expect a city map, some of my vintage map collection, and more botanicals to find their way in.
Other DIYs planned:
- a coffee/info station (for things like the wifi password, toiletries, etc.)
- art
- curtain rod (woodworking project)
- floating shelves
So, there you have it! If you’re the kind of person who prefers to stalk every minute of this makeover (I’ve already been sharing some sneak peeks on social), you should definitely follow me as well on Instagram. IG stories are becoming a new favorite way to share my thought process behind the scenes and give hints at what’s coming next.
Ready? Let’s jump right in! Oh, and Charlotte?
P.S. I realize that’s a number of different things to follow, but think of it as a smorgasbord to pick and choose based on preference — aka, a way (if you want) to see more stuff as we go. My posts will still cover the updates just fine. But behind the scenes stuff is going on IG between posts because it’s easy to share them there, and video is meant to add that “real life” layer in because it puts me in front of the camera. So, a little mix of everything!
The post Dueling DIY: Guest Room Gauntlet! appeared first on Ugly Duckling House.
from Ugly Duckling House https://www.uglyducklinghouse.com/dueling-diy-guest-room-gauntlet/
Monday, 5 February 2018
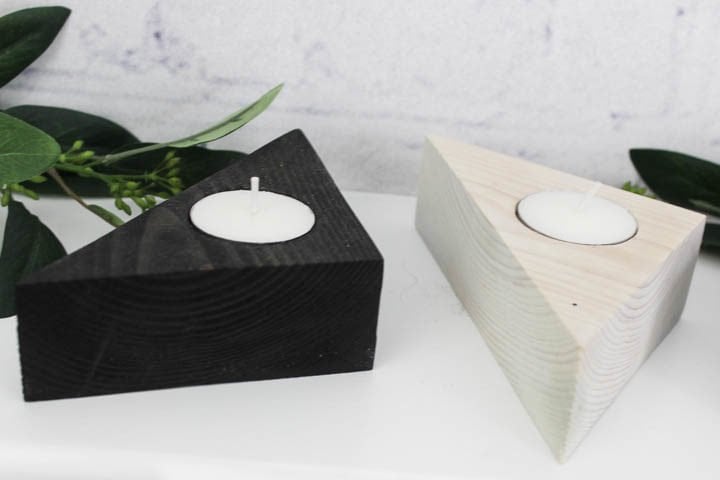
Triangle Tea Light Holders

Hey everyone! It’s Lindi, back again from Love Create Celebrate! I hope you’re all happily recovering from he hustle and bustle of the holiday season. I know I usually need a few weeks before I’m fully functional again! I’m starting off the New Year with a few simple home decor projects, which includes these modern triangle tea light holders. If you have some scrap 2x4s lying around, you can make these!

I’ve shared a couple of other scrap wood projects on here before, including the simple white-washed ornaments and some square napkin rings, but I can’t help it! It’s so easy to create something beautiful from a discarded piece of wood!
This post contains affiliate links. See disclosure page for more info.
Materials:
- Scrap 2×4″ board
- Mitre saw
- Drill
- 5/16″ brad point drill bit
- 1 1/2″ Forstner bit
- Sander
- Wood stain
Here’s how to make your own tea light candle holders:

Start by setting your mitre saw at a 45 degree angle. Cut straight from one corner on the 45. This will cut a triangle with two 3.5″ sides and a longer (almost 5″) hypotenuse (hello grade 9 math!).

Then you can bring your saw back to centre (90 degrees) and make a straight cut from the edge you just cut. This will cut a second triangle, exactly the same size as the first. Bonus of this project is that there is zero waste!
Keep repeating those steps until you have the number of triangles you want.

Use a speed square to draw a straight line in the centre of the triangle, then measure 1 1/8″ up from the flat edge of the line (above). This will be the centre that you drill into.

Drill a pilot hole into the centre that you just created using a 5/16″ brad point drill bit.

Then centre your foster bit over your pilot hole and drill down the height of a tea light. Ours was about the depth of the bit. If you use a drill press you can set it to the correct height. If you are using a drill, make sure the piece is clamped down well.


Finally, stain your candle holders in the wood stain of your choice :) I chose to use white wash and ebony stains because I love the contrast of black and white in my decor.

When I made these, I finished off my entire 2×4″ scrap board, which meant I had a few extras to give as gifts too. So far everyone who has received one has loved them!


Hope you liked the project! Would you use a different stain for yours? I’d love to hear your ideas!

The post Triangle Tea Light Holders appeared first on Ugly Duckling House.
from Ugly Duckling House https://www.uglyducklinghouse.com/triangle-tea-light-holders/